Thursday, October 31, 2013

How to make a model of The Turtle Submarine

The Turtle Submarine was invented by David Bushnell to be used during the American Revolution to attach bombs underneath enemy ships.  Daniel first heard about this from the series, Liberty Kids.  He decided he wanted to research a little and ultimately did his history "share" project on The Turtle. 

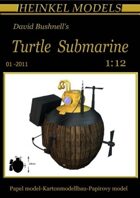
Display boards are nice, but Daniel wanted to make a model of the submarine.  We purchased a paper model .pdf, but it was too difficult.  So, we decided to come up with our own.  I helped Daniel design this model based upon the picture below of the paper model we bought, but he did the majority of the work of putting it together.  

1/12 David Bushnell's Turtle Submarine Paper Model


Here's how we did it:  

Supplies:

1 2 liter bottle
2 empty ribbon spools
Masking tape
Acrylic paint- black, yellow, brown
Construction paper- blue, yellow and black
Sharpie
3 pieces of a skewer painted black
black and gold pipe cleaners
2 cream colored beads
1 small square jewelry box

Procedure:

First, we took a 2 liter bottle and cut out a large portion of the middle.  Using masking tape, we taped the 2 halves together into what looked like an oval acorn shape.  On top of the bottle half of the 2 liter bottle, we taped an empty cardboard ribbon spool.  Then, we covered the entire surface of the bottle with masking tape.  The actual Turtle submarine had vertical wooden planking spanning most of it's body.  So, we made sure that the masking tape was placed to mimic that effect.  

Painting was next.  Daniel painted the top portion yellow with a small band of black underneath. 


Then, he painted and prepped the accessories that would be attached to the surface of the submarine.

An empty jewelry box painted black that will be adhered to the back with double-sided tape.


Air tubes made from gold pipe cleaners with beads on the end to be inserted in the top of the ribbon spool.  We poked  2 holes in the top with a screwdriver and inserted them. 


Our three dowel rods painted black will be inserted into the top and side.  Black pipe cleaners will be used to fashion propellers, connection wires and other submarine-y type apparatuses.   We had to be very careful poking the holes into the sides and top.  Daddy helped with this part. 


The bottom 2/3rds Daniel painted brown.  When it dried he went back and added black lines to mimic the wooden panels and dots for rivets.


Blue and yellow construction paper were cut and glued together to resemble the 5 port holes.  Then glued to the top of the model. 

Since the top of the 2 liter bottle is actually the bottom of the model, we needed a stand.  Daniel painted a taller cardboard ribbon spool brown and it made a perfect stand for his model. 

The finished product: 


 For more information about David Bushnell's Turtle Submarine:

Turtle (submersible)
The Submarine Turtle:  Naval Documents from the Revolutionary War
Books:
American Turtle Submarine The Best Kept Secret of the American Revolution
Attack of the Turtle

30 Days of Thanks- Day 2


Every good and perfect gift is from above, coming down from the Father of the heavenly lights, who does not change like shifting shadows.
James 1:17


Things do not always go the way we plan and it's in those moments that giving thanks is the most important.

So I give thanks:

  • for ibuprofen when I have a headache
  • beautiful skies
  • glorious colors
  • little boys and plastic bag kites

  • long walks and good talks--  Every Wednesday while Tera is in piano, Daniel and I have the greatest talks.  We walk up and down their driveway and he just talks....
  • for having money to buy groceries
  • a friends things were stolen and we prayed they'd be returned.  They got everything back!!!  Praise the Lord for answering prayers!
  • for unintentionally sleeping in because I really needed some extra rest


Starting tomorrow, you can join Quiet Pandemonium's Gratitude Challenge as well:

Wednesday, October 30, 2013

30 Days of Thanks 2013- Day 1


I forget so often to be thankful for all those little things in life. I want this month to be different.  


Today I'm thankful for: 

  • little boys and ladybugs

  • healthy children playing

  • hugs after Tera made 100 % in math 
  • strength to get done what is needed, when it is needed
  • quiet time with God first thing in the morning
  • fall colors


What are you thankful for today?  Share with us and link up below!  I'd appreciate it if you would grab my button from the sidebar and link back to this post. 


Starting Friday, you can join Quiet Pandemonium's Gratitude Challenge as well:


Tuesday, October 29, 2013

Mosaic Reviews: See the Light Art Projects DVD: Sunflowers


Art...my kids love art!  My husband's family has a lot of artists.  His brother is phenomenal, as well as their grandfather and great-grandfather.  I always say, visual art is not my thing.  I struggle with my perfectionism with every project I attempt.  For our art instruction, I rely heavily upon online tutorials and projects that are easy for the kids to follow other teacher's instruction. We have also done quite a bit of picture studies Charlotte Mason style.  

Since, Daniel got to do the last review with EEME.  I let Tera pick which SEE THE LIGHT Art Projects DVD with Pat Knepley, we would try out.  I knew before she even said it out loud.  Sunflowers!   She has loved Van Gogh and his works for a long time.  It was a great choice for our first attempt.

About this product:

Art Projects is from the company See the Light:  Drawing Children to Him  founded by Dave and Pat Holt, who are passionate about sharing their faith through art instruction.  Pat, tells of being an elementary school student watching a chalk artist paint a picture and then use a black light to highlight hidden things in their painting.  That made such an impression upon her.  Here's the interesting part, my husband's grandfather was a chalk art evangelist, who traveled the country and on missionary trips to Native American reservations doing that very thing.  It could have been PopPop that she saw!   How cool is that! 


What is "See the Light" from Kip Perry on Vimeo.


See the Light has three DVD series:  Art Class, Art Projects and Bible Stories 

Video Sample: 


Art Projects - 9 DVD Series - Trailer from Kip Perry on Vimeo.


Let's get started!

So, here we are with our vase of sunflowers, oil pastels, and paper.  Very minimal supplies. 


Lesson 1: 


Lesson 2:


Lesson 3:


Final version:


So, I had this thought!  I'm always saying what a horrible artist I am, could See the Light teach me how to produce something I was pleased with?  Well, here's my final product.  Overall, I think it turned out nice.  As with any perfectionist, I can find things I really don't like. 


But I liked it enough to display it proudly alongside my children's work!


What we liked:

  • Project is broken into four short lessons.  Each of the four lessons is right around 20 minutes long, not counting pause time for kids to work on the various components.
  • Art History combined with instruction.  We learned things about Van Gogh we never knew before.  These videos weave art appreciation and history throughout the lesson.  Both my kids really enjoyed this part. 
  • Christian worldview- I loved how Pat brought in relevant scripture references and Van Gogh's Christian experience.  I like the way the instructor pointed out Van Gogh's struggles with anxiety and feelings of self-doubt.  Christians are not perfect, we struggle like everyone else.  
  • Freedom within form-  There was so much encouragement from the artist for the viewer to do things their own way.  Yes, we are all drawing sunflowers, but we can make choices that make our project uniquely our own.  
  • Helps meet the high school fine arts credit.  See the Light has a .pdf that tells you how to use these videos and supplemental activities to fill the hours needed to get high school credit.  I thought that was just totally awesome and helpful to parents who cannot afford outside art instruction.
  • Affordable!  Each individual video is priced at $14.99 and can be used for multiple ages and multiple times!
  • Modest supply lists-  We needed very few supplies to complete this project.  We substituted a different paper type than the one suggested, but our projects turned out just fine. 


What we struggled with:

  • Sometimes as the instructor was giving directions, she'd initially leave out some important "...but don't do this..." until after you had already started.  So, after a minor hiccup on the first lesson, we just tried to watch each lesson before attempting any drawing.   That fixed most of our missteps and listening carefully before beginning took care of the rest.  


Purchase information:

Art Projects: $14.99 per video.  There are 9 videos in this series that focus on a project in the style of a famous artist.  The boxed set is offered for $99.  Another purchasing option is a DVD of the month club, where each video is sent on a monthly basis for $12.50 each. 


I'm am so excited to try out the Bible Stories series that will teach my children how to produce art in the style that their great-grandfather used to share the Gospel all over the country. 


Monday, October 28, 2013

30 Days of Thanks 2013


Thanksgiving is a month away and to be honest, I've been just a little preoccupied lately with things that don't really matter in the big scheme of things. Things that annoy, gripes, complaints...things just not quite going the way I'd like.   And the biggest thing of all...busyness...busyness...


Be joyful always; pray continually; give thanks in ALL circumstances, for this is God's will for you in Christ Jesus.  

1 Thessalonians 5:16-18

I recently saw this video dealing with happiness and gratitude.  It's quite interesting!


I'm very well aware that thankfulness is not a new concept.  Gratitude journals or sharing an ongoing list of thanks are well known practices.  Others have done this kind of thing and were/are a lot more eloquent than I am or ever will be.  There is something in the practice of thanksgiving that brings the soul into the presence of God in a real and powerful way.  Recognizing and thanking the Creator for all things and in all circumstances is important.  We cannot do it enough and we often don't do it at all some days.  I want to spend this next month (and longer) getting myself back in the habit of thankfulness. 


Every good and perfect gift is from above, coming down from the Father of the
heavenly lights, who does not change like shifting shadows.
James 1:17 

I invite you to join me in this exercise for the next month (Starting October 30th).  Practice thanksgiving!  Give God the thanks He deserves.  Share it on your own blog, facebook, or just tell God.  Look past "things" and thank God for who He is, what He's done, or what beauty you see around you.  I'm challenging myself to be thankful in everything.  Even the difficult, messy, crazy parts of life.  God is there in those situations, too!  


 Praise the LORD. Give thanks to the LORD, for he is good; his love endures forever.
Psalm 106:1 

Join me by posting/giving thanks every day leading up to Thanksgiving.  Grab my button from the side bar and please link up or leave  a comment telling me you're participating!  


History "Share" Projects Up Close...


 Tera has been researching Sergeant York for awhile now.  So, when I decided to organize a local history "share" event, she knew right away which topic she wanted to do.  She made the board, a lapbook with games inside and had a digital picture frame with a slideshow of our trip to the Sergeant York State Park. 


Daniel heard about the first U.S. submarine, The Turtle invented by David Bushnell, in an episode of Liberty Kids.  He made a display board and a model of the submarine.  (I'll post about how we made that soon!)


Michael just had to do a project like his brother and sister.  I had some conditions related to his project. 
1.  Obviously, he would need help.  
2.  It needed to look like he did the majority of the project.  

We read lots of books on George Washington Carver.  

I had a packet on peanuts from the Peanut Council, so we started there.  I printed out 2 worksheets that he colored and labelled the parts of a peanut and the parts of a peanut plant.  

Then, I found a list of things George Washington Carver made out of peanuts.  I read the list out to Michael and had him pick things.  He then wrote those on a strip of paper.  I cut out peanut shapes and clip art to symbolize what he wrote.  

We dissected a peanut and he labelled each part:  Testa, Pod, Germ, Cotyledon

He summarized who George Washington Carver was and picked pictures from the computer to print out.  His sister helped him glue the things on the board where he wanted them.  

Last, he wrote out a recipe for peanut butter cookies.  

I'm sure this looks like a lot for a 4 year old, but this project was done in small increments over weeks.  Whenever he was tired, we just put it away and came back to it another day.  It was great incentive to see his sister and brother working on their own projects.  He wants to be just like them!  


Sunday, October 27, 2013

How to Host Your Own History Fair-History "Share" Event

How to Host a History "Share" Event: 

If you love history...
Your kids love history... 
You want to share that love and passion with others....
You should host your own History "Share"!


My kids' projects: 


Sergeant York


 George Washington Carver and His Peanut


The Turtle: The 1st U.S. Submarine


Visitors and participants viewing projects


Yesterday, my kids and some others participated in a history fair event that I called History "Share".  I saw pictures of another home schooling friend doing the same type of event in her co-op.   My kids just love history, so I knew we wanted to give it a try.  I also knew I would have to organize the event, if I wanted it to happen.  So,  that's exactly what I did.  It was important to me to keep this a very low-stress, low-key event. 


Here's how I organized this event:

First, I made it clear that this would not be a competitive event.  No judges, prizes, rules.  I wanted students to be able to express their love of history in any way they saw fit.   I didn't want to have an official history fair where students had to stay within a specified theme. 

I sent out an email with the following instructions:  

1.  Pick a category:

Historical Figures
Historical Time Periods or Events
Geography
General History
Government or Economics

2.  Research or learn about your topic

3.  Pick your display type.   Use any or a combination of the examples below, or some of your own unique ideas.   Be creative!!

Science fair type display boards
Maps (salt, relief, battles,etc.)
Charts, graphs
Costumes
Pre-recorded performances
Models or dioramas

4. Each participant will receive a "passport" booklet to document their journey through History "Share".  Each participant will need to make or buy a unique stamp that represents their project (rubber stamp, sticker, colored labeled symbol) to "stamp" into your fellow historians' passports as they visit your project during the History "Share" event.


The stamps were my favorite part of this event.  Some kids printed out stickers or labels.  A project on the sarcophagus used hieroglyphics.  A lot of students used rubber stamps.  Two of my kids just printed off a stamp or short paper strip with their name and project title.  They used glue to adhere them to the passport pages.   

I purchased passports from Amazon for each participant and sold some of the extra at the event for visitors.  Each participant paid a small entry fee that covered the cost of the passport and a small donation to the church for their hospitality. 


We set aside: 

30 minutes set-up for participants
1 hour for participants to view the other projects
1 hour for participants to welcome visitors 
30 minutes to clean up 

Attenders were to arrive 15-30 minutes early to our specific venue (a fellowship hall of a church that hosts our enrichment classes).

I passed out certificates and passports at the beginning- very informally.  As I passed out certificates, I had each participant pull a number (1, 2 or 3) from a bag.  Your number determined which group you were in.  For the first 15 minutes, group #1 visited the projects of other 2 groups to have their passports stamped and to ask questions and/or look at the other projects.  Then, we switched (group #2 visited groups #1 and #3 and so on)  The last 15 minutes the participants went around to see any projects they missed.  

The next hour, we opened the event up to family, friends and all members of our local home school support group.  

This was my first time organizing an event of this nature.  I was very nervous about how everything would come together.  It was worth it too see how excited these students were about their chosen subjects.  They were so passionate and knowledgeable as they answered questions and interacted with each other and visitors.  I was so glad we decided to "share" our love of history! 

For more ideas, check out this article- Host Yourself a History Fair

LinkWithin

Related Posts Plugin for WordPress, Blogger...